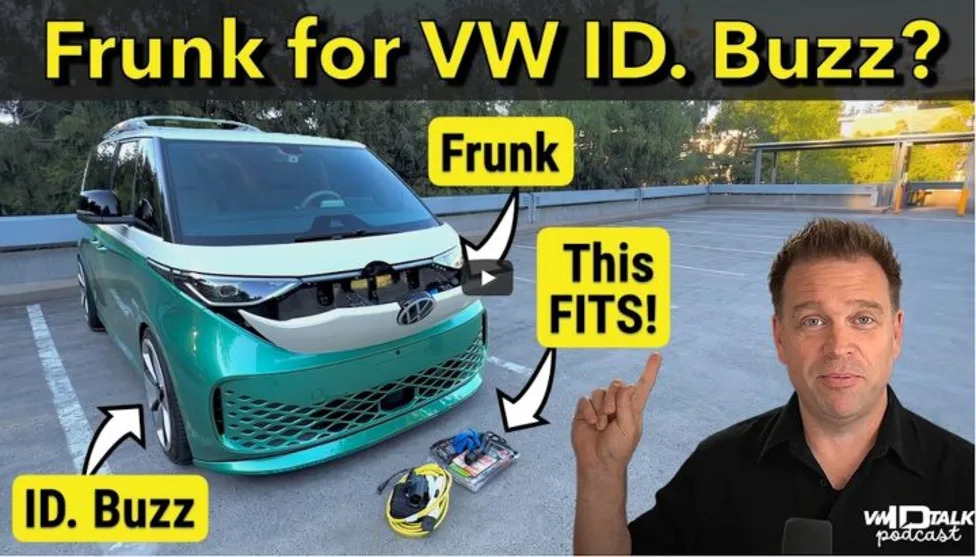
Welcome back to another episode of VW ID Talk! Today, Jeremy is back to show off an incredible DIY modification to his "smiley" ID. Buzz: a fully functional frunk!The factory ID. Buzz front area is mostly an open drop down to the fender well, but Jeremy completely transformed it. We dive deep into his custom build, covering the materials, the process, and the clever safety features he added to protect the car and his hands.In this episode, we cover: AdvertisementAdvertisementJeremy's use of milled stainless steel sheets with 5 mm holes from Amazon to create the shelves. - https://amzn.to/42YKVF3 - for lower piece 23.6x11.8 - https://amzn.to/4ulAR4Q - for upper piece 19.6x9.8How he secured the removable pieces using industrial-strength indoor/outdoor Velcro to maintain access to the 12 Volt battery and AC lines.- https://www.amazon.com/VELCRO-Brand-I...The fun decorative touches, including a VW surfboard pin, a Skoda-style washer fluid funnel, and a custom Energizer battery theme!And the LED Smile kit - https://amzn.to/43eGt4QA transcript, summarized by AI and edited by a staffer, is below.AdvertisementAdvertisementThe TTAC Creators Series tells stories and amplifies creators from all corners of the car world, including culture, dealerships, collections, modified builds and more.[Image: YouTube Screenshot]Become a TTAC insider. Get the latest news, features, TTAC takes, and everything else that gets to the truth about cars first by subscribing to our newsletter.SummaryIn this episode of the VW ID Talk podcast, Jeremy returns to showcase a custom modification to his Volkswagen ID. Buzz: a functional and decorative front trunk ("frunk") upgrade.The ProblemThe ID. Buzz's factory frunk area isn't very useful. It contains open cavities where small items can fall into inaccessible areas near the fender wells. Jeremy wanted to:AdvertisementAdvertisementMake the space functional for storage.Add visual interest for car shows.Keep everything reversible and non-destructive.The Custom Frunk BuildJeremy created a custom storage system using:Pre-perforated stainless steel mesh panels purchased from Amazon.A custom-bent lower stainless panel.Rubber door-edge trim to cover sharp metal edges.Industrial-strength outdoor Velcro for mounting.The installation:Requires no drilling or permanent modifications.Can be removed easily for access to service points such as the 12V battery connection and AC components.Uses pressure fitting and Velcro to stay securely in place.AdvertisementAdvertisementDesign FeaturesThe frunk includes:Two usable storage compartments.Decorative stainless-steel panels covering exposed foam.A VW emblem accent in the center.An "Energizer battery" themed lower panel inspired by EV battery imagery and a custom car Jeremy saw in Poland.The project is designed to make the otherwise empty frunk more interesting during car shows.Build ChallengesJeremy explains that the hardest parts were:Creating accurate cardboard templates.Cutting and shaping the stainless steel.Avoiding scratches and cuts from sharp metal edges.Installing everything without removing the front bumper.AdvertisementAdvertisementHe recommends:Building cardboard templates first.Using edge trim before final fitting.Being careful around sensors and wiring.Using industrial-grade Velcro for durability.Storage Capacity TestThe hosts test how much the modified frunk can hold. They successfully fit:Snow tire socksTwo pairs of glovesA first-aid kitTesla charging adaptersA Level 1 charging cableThe test demonstrates that the modification turns previously wasted space into practical storage.DIY AdviceFor anyone wanting to replicate the project, Jeremy suggests:Purchasing perforated stainless steel mesh sheets.Making detailed templates before cutting metal.Prioritizing the lower storage shelf, which provides most of the added functionality.Using rubber edge guards and heavy-duty Velcro.AdvertisementAdvertisementFun Final TouchThe hosts add a 3D-printed decorative "9-volt battery" piece to continue the Energizer theme, joking that the frunk now resembles a giant battery.Teaser for Next EpisodeJeremy reveals that after spending so much time upgrading the frunk, his rear trunk became "jealous." He hints that the next episode will feature a factory-inspired custom modification in the rear cargo area of the ID. Buzz.Key TakeawayThe episode is essentially a DIY walkthrough of how Jeremy transformed the ID. Buzz's largely unusable frunk into a practical storage area while adding personality and show-car appeal, all without making permanent modifications to the vehicle.