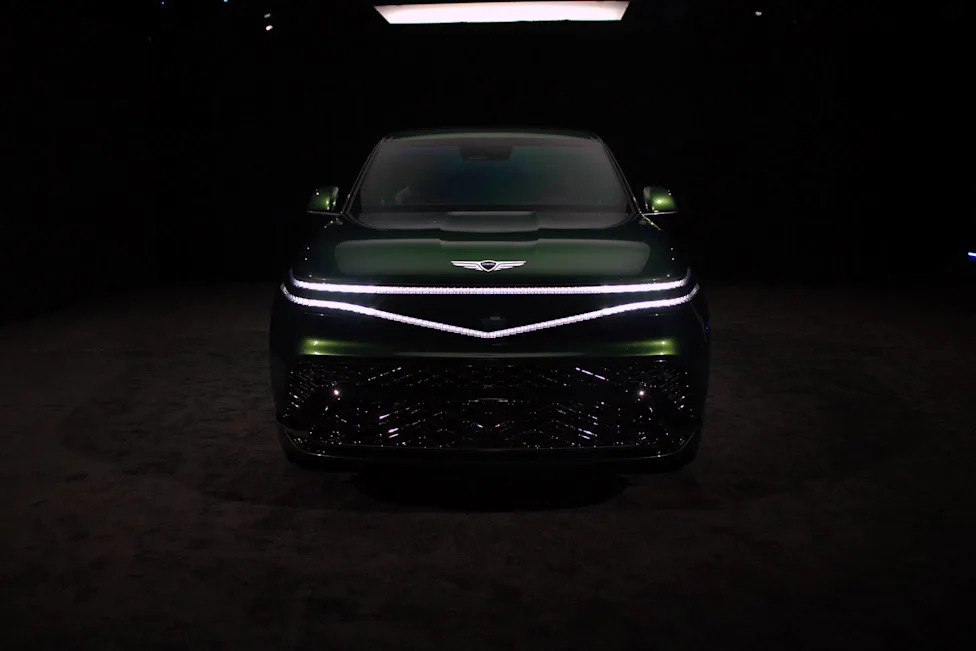
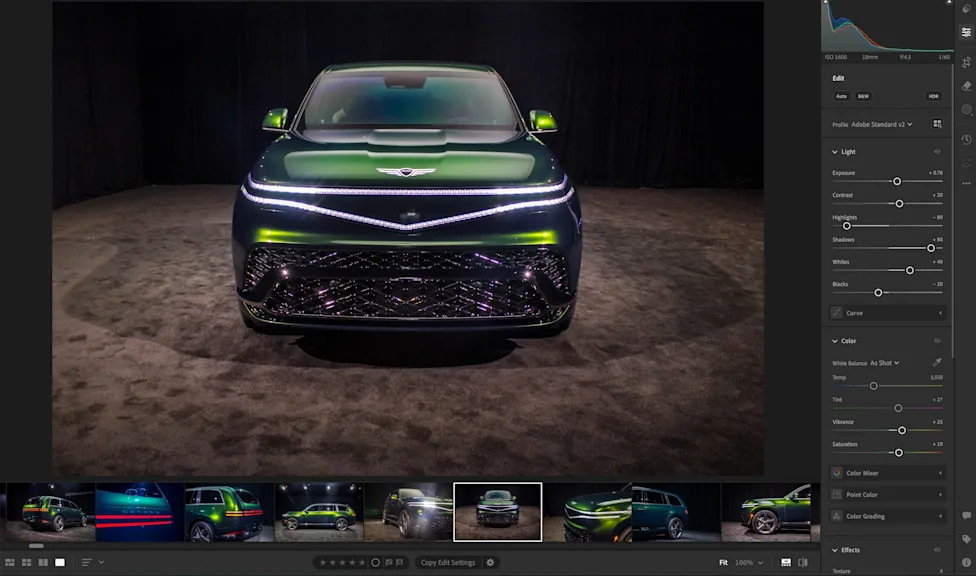
Autoblog and Yahoo may earn commission from links in this article.Here, you'll learn how to take a half-decent photo of a car. Hopefully, it'll give you a good platform on which to build your own style and give you the tools to express yourself however you'd like.I am not a photographer. I am a journalist. I take pictures to convey information. That means my photos need to clearly show my subject in as much detail as possible to illustrate for my readers just what I'm talking about.AdvertisementAdvertisementI am also assuming that, for the sake of brevity, you understand the basics of working with items like a polarizer, a decent DSLR or mirrorless camera, and basic editing software. There are plenty of guides out there to help you get there. Here, we're going to focus on why and how I edit and compose my photos to convey the subject as best I can in some less-than-ideal environments.Example: Editing Head-On Beauty Shot Of A Too-Dark CarLet's use this dead-on shot of the new Genesis GV90. I chose this because I had to make compromises to get this shot, as you will.My unedited photoChase BierenkovenView the 2 images of this gallery on the original articleFirst, my liabilities: I was forced to use a wider perspective than I wanted. My back is pushed up against a curtain here. Normally, you want to use a better focal length, ideally starting around 50mm – this is roughly what our eyes actually perceive objects at, but that requires you to be quite far from the subject. It also won't distort a subject the way this shallower one did here – the front end is swollen due to this, which I mitigated somewhat by opting for a higher angle.AdvertisementAdvertisementIt's very, very dark despite the lightbox just overhead. The room is unbelievably crowded with other people vying over the same car for the same content they need, and time is a factor. In fact, I spun my polarizer the way I did to cut reflections, but left some in so that you can't quite see the two guys inside filming.You can see the decisions I've made in Lightroom below. Because the reflections from the lights have forced the use of a polarizer in this environment, I'm starting by working light back in. Having a camera with a high ISO can help here, and most editing software features a denoise function to cut that back out later. It'll give you some headroom to turn up the exposure more if needed. Generally, I adjust ISO till I can see a bit of grain in the display on the body, then walk it down one.I make adjustments to exposure, whites, and blacks. The latter I didn't need much more of; just look at the room I'm in. Out in the sun, the story is the opposite. Then, I'll play with the shadows and highlights until the car is clear and the light and contours on the body look defined.Once my subject is clear, I'm going to crop and straighten out my photo as needed. I'm not quite dead center here for the shot I want, but cutting out the lightbox and straightening the photo helps improve the composition. Next, color.AdvertisementAdvertisementThis is the fun bit. I play with my vibrance and saturation until the colors look the way they did when I was there, which means very subtle tweaks to each. Next to light, these are the things that'll ruin your photo and make it look over-edited. Be conservative to start. I got lucky here, and this green popped out great because of the studio lights. However, you can also touch up duller or more subtle paints by messing with the color mixer and grading. Use each sparingly, and only tweak the saturation a few points. If you really have to punch it up, apply a masking layer around the vehicle and edit within that. Just make sure your mask is nice and tight; you don't want the outline visible.This is not my best shot, but the car is clear, its details are prominent, and there's nothing extraneous in the shot. It is a photo of a Genesis GV90 as it looked that day in the booth, nothing more.This story was originally published by Autoblog on Aug 21, 2026, where it first appeared in the Features section. Add Autoblog as a Preferred Source by clicking here.