Unless you’re a complete Windows 11 novice, you’ll have come across Safe Mode before - but what exactly is it, and how do you access it in Windows 11?
- Why boot into Safe Mode in Windows 11?
- How do I know if Windows 11 is in Safe Mode?
- How do I boot into Safe Mode in Windows 11?
- Navigating the Recovery Menu
- Leaving Safe Mode
Safe Mode is a way to boot Windows 11 for diagnostics. It’s the first thing to try if you can’t load Windows 11 in the normal way.
It works by stripping out all the whistles and bells inside Windows 11, booting without loading any start-up apps or third-party drivers. It’s main use is to allow users to access a Windows system that may be constantly crashing, running slowly, or otherwise causing problems for the user.
In theory, provided Windows 11 itself isn’t corrupted, Safe Mode allows you to boot and diagnose any issues.
Why boot into Safe Mode in Windows 11?
If you are unable to boot into Windows, or you can but it misbehaves, Safe Mode can help you isolate what the problem is.
For example – you may have recently updated an audio or graphics driver, only to find that Windows 11 has become unstable or has fallen into a crash loop. Safe Mode will let you boot to Windows with all drivers disabled, allowing you to diagnose the problem and rollback the offending hardware if necessary.
Because of its deliberate limitations, you won’t want to spend more time in Safe Mode than absolutely necessary, but it can be a lifesaver if your machine throws a wobbler.
There are some people who choose to boot into Safe Mode because, as you’ll find, it can speed up your machine dramatically. However, unless you know what you’re doing, we don’t recommend this, as among the features not supported in Safe Mode is antimalware protection.
How do I know if Windows 11 is in Safe Mode?

Quite simply, look at your desktop wallpaper. When you are in Safe Mode, the words ‘Safe Mode’ and sometimes the Windows build number are overlaid in the bottom right hand corner, just above the clock.
Beyond that, you’ll notice that all of the tweaks you’ve made to personalise Windows, such as colour schemes or themes, will be disabled, and everything will look fairly basic as a result.
How do I boot into Safe Mode in Windows 11?
There are several methods for booting into Safe Mode. The good news for users of previous Windows iterations is that the various methods are almost exactly the same in Windows 11, as are the menus you will be faced with.
In order to get into Safe Mode, you need to first access the Recovery Menu. Let’s look at the different methods for accessing this one at a time.
Safe Mode in Windows 11: Method One – The Start Menu method
The first, and easiest way is using the Start Menu inside Windows 11's desktop.
- Click on the ‘Start’ Menu
- Click on the ‘Power’ button in the bottom right of the menu
- Hold down the ‘Shift’ key
- While holding down ‘Shift’, click on ‘Restart
- Wait for the reboot
Safe Mode in Windows 11: Method Two – The Advanced Start Method

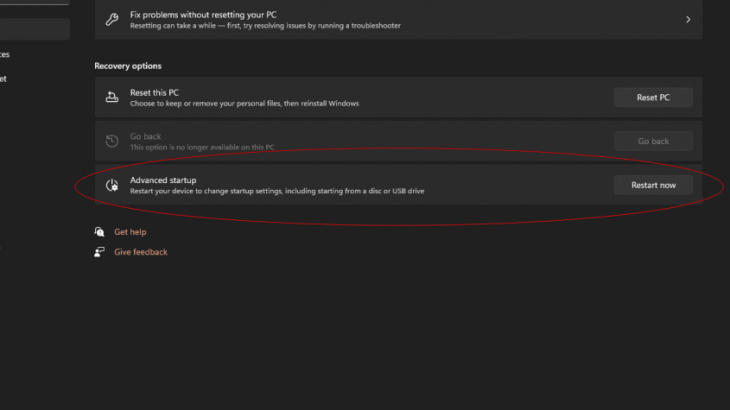
- Click on the Windows key + i (or open Settings from the Start Menu)
- Click on System from the sidebar menu (you should already be in this menu)
- In the main window, look for Recovery and click it
- Click on ‘Advanced Startup’
- A pop up will tell you ‘We will reboot your device, so save your work’
- Click on ‘Restart Now’
- Wait for the reboot
Safe Mode in Windows 11: Method Three – The Function Key method
This is great if you can’t boot into Windows 11 at all
- Start with the computer completely shut down.
- Hold down the power key for at least ten seconds so the machine doesn’t try and ‘Quick Start’
- Press the power key again to turn on the machine whilst holding down F11*
*On some machines this will be F8 instead of F11 and on others won’t work at all without a registry hack. Check your manufacturer for more information
Safe Mode in Windows 11: Method Four – The ‘When all else fails’ method
If you’ve tried everything else and still can’t trigger safe mode, there’s a workaround.
- Start with the computer completely shut down
- Turn on the computer
- Immediately hold down the power button until the boot is interrupted and the computer shuts down again
- Repeat steps 2&3 twice more
- After the third interrupted reboot, you’ll get a popup offering ‘Startup Repair’
- Select Advanced Options
Navigating the Recovery Menu

Once you’ve completed the steps in any of the above methods, the computer will reboot into a recovery menu.
- Click on ‘Troubleshoot’
- Click on ‘Advanced Options’
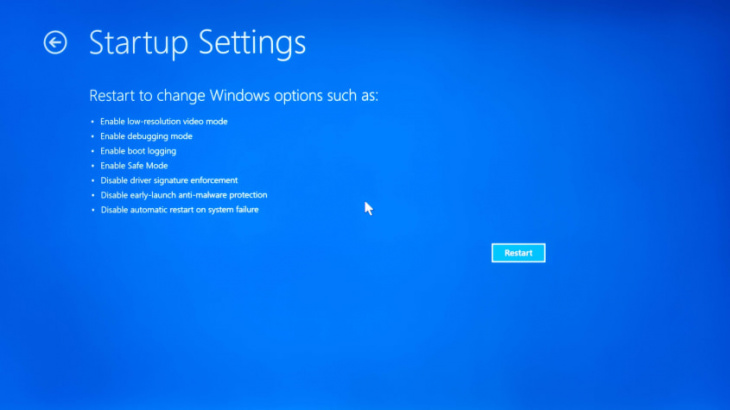
- Click on ‘Start Up Settings’
- Click on ‘Restart’

You’ll then be given a variety of Safe Mode options to pick from. Option 4 is typically the default for most people, providing Safe Mode with all networking options disabled, including Internet connectivity. This will let you diagnose any issues inside an isolated environment.
Option 5 – Safe Mode with Internet connectivity – is for those instances where access to the Internet is needed in order to diagnose a problem. However, it’s critical to understand that your system’s security protections will be disabled in Safe Mode, so it’s advised you only choose Option 5 if absolutely necessary.
Option 6 – Safe Mode with Command prompt – will take you to a Command Line window instead of the desktop when selected. This is meant for experienced users and those that find it easier to navigate through Windows using commands.
Whichever option you choose, your machine should then boot in Safe Mode.
Leaving Safe Mode
The good news is that once you’re done, a simple reboot will put you back into regular Windows 11.
If you need to reboot and then go back into Safe Mode, you’ll need to follow one of the above methods each time.
Keyword: How to boot Windows 11 in Safe Mode